Resources
Literature
If you are looking for more detailed information on the products we offer please refer to the product sheets below. If you have more questions please contact us and we can assist you.
- Premier V Vinyl Buck
- Premier V Vinyl Sash
- DUO Hopper
- Stif Back II Area Wall
- Quarry View Window Well
- Steel Ladders
- Thermal-Hinge Cover
- Steel Grate
Egress Code
Daylight Basments products by Monarch Materials Group Inc. are designed to meet and exceed International Residential Code (IRC-2006) for egress/rescue openings and code requirements. For more information on egress code click here. If you have any questions about please contact us.
View Egress Code
Installation
Installation is easy and can be carried out during the new construction phase or installed afterwards as a retro-fit installation. We have products for every situation so please inquire about how we can help you fullfil your egress window needs. Expand the section below to view the detailed installation instructions.
Expand
New Construction Installation
- Do not remove plast film
- Check top label for window orientation. TOP INSIDE indicates top and interior surface
- Position window in desired location and nail through bracing at head first then proceed with both jambs and sill. Use at least 10 - 16 nails.
- Form ties on windows 4 ft. or wider must be placed through center of window to prevent form blowout. Push ties through plastic as required.
- Remove bracing after forms have been stripped.
Retro-Fit Installation
- Excavate or dig soil outside of wall 18” below bottom of buck and 12” wider than buck.
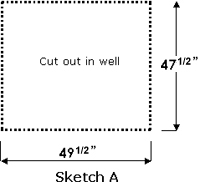
- Cut hole in block or poured basement wall 49 1/2” wide by 47 1/2” high. See Sketch A.
Note: Bottom of buck must be no further than 42” from the basement floor. (Cutting from inside will produce a lot of dust. You may first want to enclose the area with plastic.) - Remove hanging brackets from each side of buck. Place buck in hole making sure top is up and shim as required to plum window. (Do not remove wood bracing)
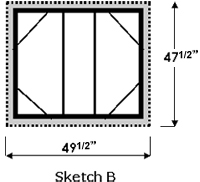
- Fill the space between the wall and the buck with triple expansion foam.(3 cans should do) See Sketch B. Let foam cure.
- Scrape off excess foam & caulk inside and out along joint between buck and wall. (Trim window as req’d)
- Tapcon Stif Back Well to outside of wall.
- Remove all wood bracing.
- Fill bottom of well with clean stone up to bottom of well.
- Place ladder in well as required.
- Place grate or hinged cover on well. (Must be removable.)
- Place screen and sashes in window from inside.
- Fill around outside of well with topsoil.
- Finish inside as required.
Dealers
For information on dealers please contact us.